
How to Stream on Twitch Using OBS (Beginner's Guide)
Learn how to stream on Twitch with OBS Studio. Get your stream key, set the right bitrate and encoder, build a scene, and go live. Step-by-step beginner guide.
This guide shows you how to stream on Twitch using OBS Studio from a blank screen to live in under an hour. You will create your Twitch account, grab your stream key, install and configure OBS, build a basic scene, and go live with settings that hold up. OBS is free, and it is the tool most Twitch streamers start with. No paid software needed.
Everything below is the current 2026 setup. Where Twitch gives a range instead of one number, you get the range.
What you need before you start
- A Twitch account (free).
- OBS Studio, downloaded from obsproject.com. Free, on Windows, macOS, and Linux.
- A stable upload speed. Aim for at least 6 Mbps up for 1080p, or 3 Mbps for 720p.
- A microphone, and a webcam if you want your face on screen.
Step 1: Set up and prep your Twitch account
- Go to twitch.tv and sign up, or log in.
- Turn on two-factor authentication (2FA). Twitch requires it before you can stream. Go to Settings > Security and Privacy and enable it with your phone.
- Fill out your channel: profile picture, a short bio, and a channel banner. Viewers judge fast.
That is the whole account side. You do not need Affiliate status to go live. Anyone can stream on day one.
Step 2: Get your Twitch stream key
Your stream key is how OBS proves the stream belongs to your channel.
- Open your Creator Dashboard (click your avatar, then Creator Dashboard).
- Go to Settings > Stream.
- Under Primary Stream Key, click Copy.
Treat the key like a password. Anyone who has it can broadcast to your channel. If it leaks, hit Reset on the same page.
You can skip copying it entirely if you connect your account inside OBS instead. More on that in Step 4.
Step 3: Install and auto-configure OBS
- Download OBS Studio from obsproject.com and install it.
- On first launch, the Auto-Configuration Wizard opens. Choose Optimize for streaming.
- It tests your machine and internet, then suggests a resolution, frame rate, and bitrate. Accept it as a starting point. You can fine-tune later in Step 5.
The wizard gets most beginners 90% of the way there. If it never appeared, open it from Tools > Auto-Configuration Wizard.
Step 4: Connect OBS to Twitch
Two ways to do this. Connecting your account is easier and safer.
Option A: Connect Account (recommended)
- In OBS, go to Settings > Stream.
- Set Service to Twitch.
- Click Connect Account, log in to Twitch, and authorize OBS.
OBS handles the stream key for you and unlocks extras like the built-in chat dock.
Option B: Paste the stream key
- In Settings > Stream, set Service to Twitch.
- Leave Server on Auto so Twitch picks the closest ingest.
- Paste the key you copied in Step 2 into Stream Key.
Either way, click OK to save.
Step 5: Recommended OBS settings for Twitch
Open Settings > Output and switch Output Mode to Advanced for full control. Twitch caps video bitrate at 6,000 kbps for every streamer, Affiliate or Partner, so there is no benefit to going higher. A stable stream beats a sharper one that drops frames.
| Setting | Recommended value | Notes |
|---|---|---|
| Output resolution | 1920x1080 or 1280x720 | 720p is easier on slower connections and older GPUs. |
| Frame rate (FPS) | 30 or 60 | 60 for fast games, 30 for talk or slower content. |
| Video bitrate | 4,500 to 6,000 kbps (1080p), 3,000 to 4,500 kbps (720p) | 6,000 is the Twitch max. Stay near it only if your upload is stable. |
| Rate control | CBR | Twitch requires constant bitrate. |
| Encoder | Hardware (NVENC / AMD / QuickSync) or x264 | Use your GPU encoder if you have one. x264 on a fast CPU works too. |
| x264 preset (if using CPU) | veryfast | Balances quality and CPU load. |
| Keyframe interval | 2 seconds | Twitch requires this. Do not leave it on 0/auto. |
| Audio bitrate | 160 kbps | Clean audio for voice and game sound. |
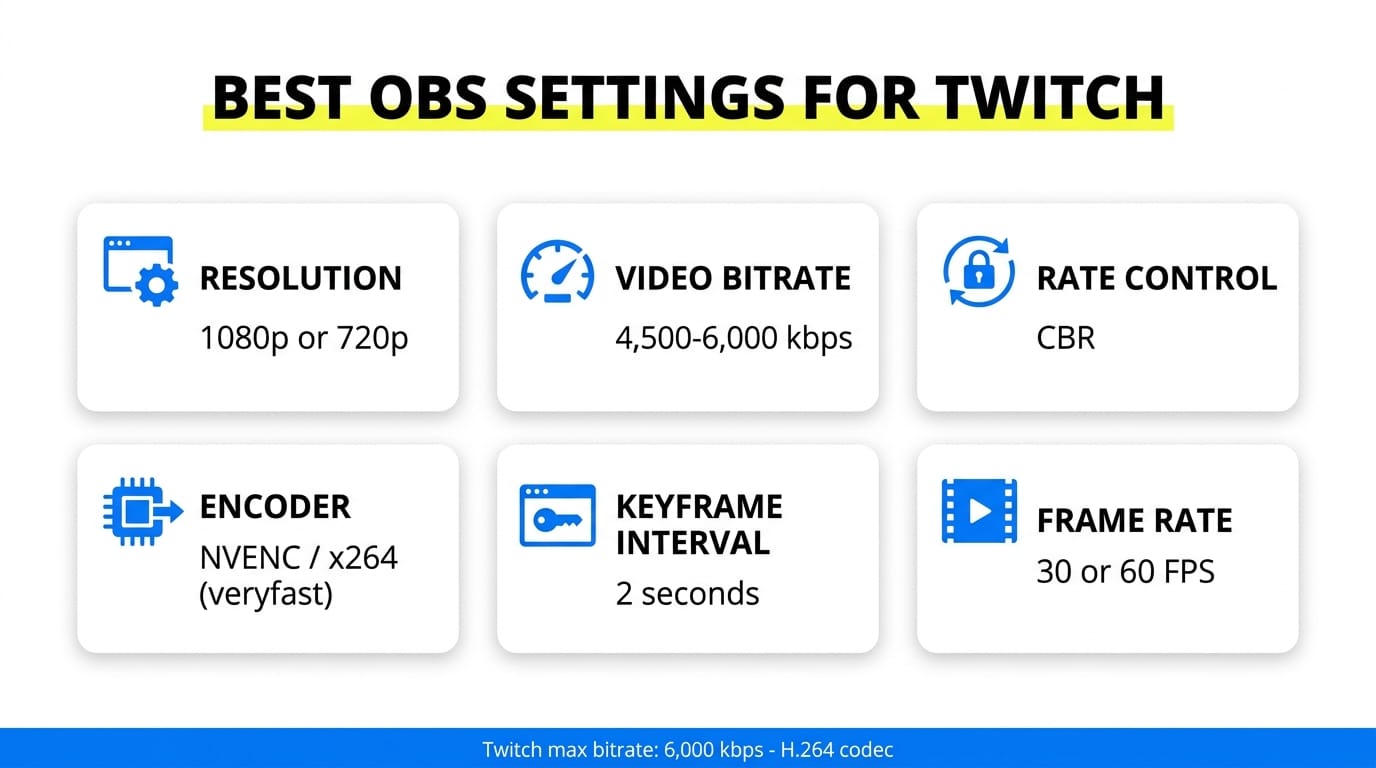
Twitch ingest uses the H.264 (AVC) codec for standard streaming. Newer codecs exist but are opt-in (see the FAQ). For a deeper look at picking a number, see our best bitrate for Twitch breakdown.
Step 6: Build your first scene
A scene is a layout. Sources are the things inside it (your game, camera, mic, overlays).
- In the Scenes box (bottom left), your first scene is already there. Rename it "Live" if you like.
- In Sources, click + and add what you need:
- - Display Capture or Game Capture for your screen or game.
- - Video Capture Device for your webcam.
- - Audio Input Capture for your microphone.
- - Image or Browser for overlays and alerts.
- Drag and resize each source in the preview. Put your webcam in a corner so it does not block gameplay.
Make a second scene called "Starting Soon" with a static image and music. It gives viewers something to land on while you get ready.
Want polls, trivia, or giveaways layered on top without new software? You can add a LiveReacting interactive overlay as a browser source in OBS in about two minutes. More on that below.
Step 7: Do a test run, then go live
- Set your stream title and category. In the Creator Dashboard Stream Manager, or via Edit Stream Info in OBS after connecting your account.
- Click Start Streaming in OBS.
- Watch the status bar at the bottom of OBS. Green is healthy. Yellow or red means dropped frames, usually a bitrate or connection issue.
- Open your channel in a browser to confirm you are live. Expect 10 to 30 seconds of delay.
- Click Stop Streaming when done.
Do the first run privately or to an empty channel. Check that your mic is audible, game audio is not too loud, and nothing sensitive is on screen.
Basic good-practice settings
- Add a chat overlay so on-screen viewers see the conversation. Here is a Twitch chat overlay tutorial.
- Set audio levels so your voice sits above the game. Aim for your mic around -12 dB on the OBS meter.
- Enable a Starting Soon and Be Right Back scene to cover breaks.
- Record locally while you stream (Settings > Output > Recording) so you have clean footage for clips.
- Save your key private. Never show the OBS Stream settings on camera.
Troubleshooting common issues
| Problem | Likely cause | Fix |
|---|---|---|
| Dropped frames (red status) | Bitrate too high or unstable upload | Lower video bitrate by 500 to 1,000 kbps, or drop to 720p. |
| Laggy or stuttering encode | CPU overloaded on x264 | Switch to a hardware encoder (NVENC) or set preset to veryfast. |
| Audio out of sync | Capture delay on webcam or mic | Add a sync offset in the Advanced Audio Properties, or right-click the source and set Sync Offset. |
| Black screen on game capture | Wrong capture mode or GPU conflict | Try Display Capture, or run OBS as administrator. |
| Stream not appearing on Twitch | Wrong service or key | Recheck Service is Twitch and reconnect your account. |
Where LiveReacting fits (and where OBS is enough)
For live gaming to a single channel from your own PC, OBS is the right tool. It is free, powerful, and does exactly this job. You do not need anything else to start.
LiveReacting is the complement for what OBS alone does not cover, starting with pre-recorded streaming:
- Stream pre-recorded gameplay as live. Plenty of streamers pre-record a session, then stream it to Twitch as if it were live, so they can go live on a schedule without sitting at the keyboard. You can even run recorded gameplay 24/7 to stay visible while your PC is off, and pre-recorded streams often pull more views than a one-off live session. See how to stream a pre-recorded video to Twitch.
- No computer needed. OBS runs on your machine and stops when you close it. LiveReacting streams from the cloud, so your pre-recorded or 24/7 channel runs without OBS while your PC is off.
- Interactive overlays. Add polls, trivia, giveaways, and countdowns that play through chat. They lift watch time and chat density, which is what Twitch ranks on. Run them as a browser source inside OBS or on their own.
- Multistreaming. Twitch dropped its exclusivity rule, so you can now go to Twitch and YouTube at once. See how to multistream to Twitch and YouTube.
Upload a video, go live in about five minutes, set and forget. The pre-recorded, interactive, and multistream features are there when you want them.
FAQ
Do I need OBS to stream on Twitch? No, but it is the most common way and it is free. You can also connect your account in OBS to skip copying the stream key. For streaming without a computer, cloud tools stream pre-recorded or 24/7 content to Twitch.
What bitrate should I use for Twitch? Twitch caps video bitrate at 6,000 kbps for all streamers. Use 4,500 to 6,000 kbps for 1080p and 3,000 to 4,500 kbps for 720p, with CBR rate control and a 2-second keyframe interval. Pick a number your upload can hold steadily.
Should I use x264 or a hardware encoder? Use a hardware encoder (NVIDIA NVENC, AMD, or Intel QuickSync) if you have a recent GPU. It offloads encoding from your CPU, which matters when you are also playing a game. Use x264 on veryfast if you have a strong CPU and no capable GPU.
Does Twitch support AV1 or 1440p yet? Through Enhanced Broadcasting, yes, but with limits. As of 2026, Twitch rolled Dual Format streaming to all streamers and 1440p (HEVC) to Partners and Affiliates. AV1 and 4K remain in the beta community and need a supported GPU. Standard streaming is still H.264 at up to 6,000 kbps.
Why does my stream keep dropping frames? Almost always bitrate or connection. Lower your video bitrate, set your OBS server to Auto so it picks the closest ingest, and use a wired connection instead of Wi-Fi. A green status bar in OBS means the stream is healthy.
Can I stream to Twitch and YouTube at the same time? Yes. Twitch removed its exclusivity rule, so multistreaming is allowed. A cloud tool or multi-RTMP setup can send one broadcast to both platforms at once.
Bottom line
Now you know how to stream on Twitch using OBS: set up your account, copy your stream key or connect your account, configure bitrate and encoder, build a scene, and go live. OBS handles the core broadcast for free.
When you want interactive polls and trivia, a stream that runs without your PC on, or multistreaming beyond Twitch, LiveReacting adds those on top. See pricing and the full feature list to pick a plan.
Transform Your Live Streams with LiveReacting
Join 10,000+ streamers who are boosting engagement and viewership by adding pre-recorded videos, games, polls, and countdowns to their streams.
Try LiveReacting for free today and take your streams to the next level!